Static site with AWS CDK
Static site with AWS CDK
In this post I will explain how I have setup the AWS CDK and used it to deploy a static site (this site you are looking at!).
The AWS CDK Getting Started Guide has clear instructions on how to get started.
Recently, I used the Python wrappers for the CDK to setup a PoC with Kinesis Firehose and Amazon ElasticSearch which was fun to do, but the missing documentation on CDK+Python made it a bit challenging and time consuming. So for this experiment I decided to use the “native” TypeScript engine instead.
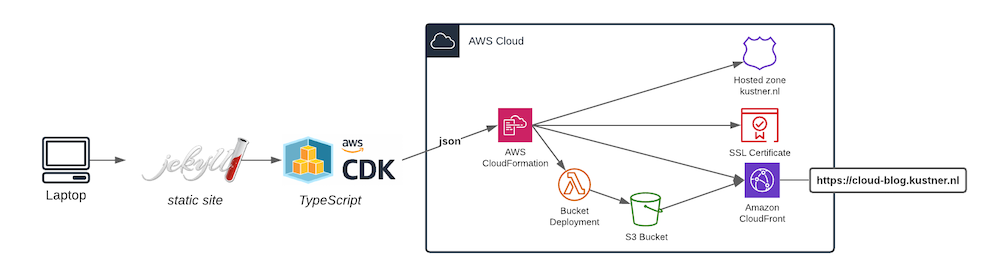
My highlevel plan is to:
- Use Jekyll to deploy this blog you are reading as a static site
- Use the CDK to:
- Deploy the static content generated by Jekyll to a S3 Bucket
- Setup the S3 bucket as static hosting
- Setup a CloudFront distribution that points to this bucket
- Use AWS Certificate Manager to host the content as https://cloud-blog.kustner.nl
Jekyll
To get Jekyll installed on my mac, I had to install a newer version of Ruby. It’s been a while since I played with Ruby, but I used the Ruby Version Manager to get the newest version installed.
Once Jekyll was installed, I created the basic structure for my static blog site:
bundle exec jekyll new myblog
I could test my site locally (on http://localhost:4000) with:
bundle exec jekyll serve
To generate static content
bundle exec jekyll build
CDK: Static content to S3
So, I have a way to create static content locally. Next, I need to get this uploaded to S3.
With the CDK I need to use these libraries:
npm install @aws-cdk/aws-s3
npm install @aws-cdk/aws-s3-deployment
aws-s3 is just like you expect needed for deploying a S3 bucket:
    const websiteBucket = new s3.Bucket(this, 'cloud-blog.kustner.nl', {
      bucketName: 'cloud-blog.kustner.nl',
      versioned: true,
      websiteIndexDocument: 'index.html',
      websiteErrorDocument: 'error.html',
      publicReadAccess: true
    });
aws-s3-deployment is an experimental CDK construct which I will be using to upload the static content to the bucket.
code used to create upload the static assets to my bucket (the Jekyll static site is stored in ./cloud.rkustner.nl/_site/):
   new s3deploy.BucketDeployment(this, 'bucketDeployment', {
      sources: [s3deploy.Source.asset('./cloud.rkustner.nl/_site/')],
      destinationBucket: websiteBucket
    });
Once the static content has been built with Jekyll, I could just run a cdk deploy to get the newest content uploaded to S3.
Gotcha! I still need to get used that you need to compile TypeScript. So I need to do a npm run build before doing a cdk deploy:
npm run build && cdk deploy
Deploying the CDK changes involves running CloudFormation stack updates, which can take a couple of minutes. This is not perfect, but since I can test changes locally with the Jekyll “serve” option that is not a big issue.
CDK: CloudFront distribution & Certificate
npm install @aws-cdk/aws-cloudfront
npm install @aws-cdk/aws-certificate-manager
npm install @aws-cdk/aws-cloudfront-origins
npm install @aws-cdk/aws-cloudfront-route53
As a true professional I want to run my site with https server side encryption.
First I create the certificate:
    const myCertificate = new acm.Certificate(this, 'CloudKustnerNLCert', {
      domainName: 'cloud-blog.kustner.nl',
      validation: acm.CertificateValidation.fromDns(myHostedZone),
    });
Another gotcha : If you want to use your own ACM Certificate with CloudFront, you need to deploy the certifcate in the us-east-1 region.
Next we can create the CloudFront distribution with this certificate and point it to our static bucket:
    const distribution = new cloudfront.Distribution(this, 'BlogDistribution', {
      defaultBehavior: { origin: new origins.S3Origin(websiteBucket) },
      domainNames: ['cloud-blog.kustner.nl'],
      certificate: myCertificate,
    });
We will also create an ALIAS record that points cloud-blog.rkustner.nl to the new distribution:
    const aliasRecord = new route53.ARecord(this, 'MyAliasRecord', {
      target: route53.RecordTarget.fromAlias(new targets.CloudFrontTarget(distribution)),
      zone: myHostedZone,
      recordName: 'cloud-blog',
    });
Last but not least, the DefaultTtl for a CloudFront distribution is 36000 seconds, or 10 hours. So I want to send an “invalidation” request to CloudFront after the new content is uploaded (this will make sure your visitors see your latest blog content). This is something s3-deployment can also do for you, simply by including the distribution in the deployment call:
    new s3deploy.BucketDeployment(this, 'bucketDeployment', {
      sources: [s3deploy.Source.asset('./cloud.rkustner.nl/_site/')],
      distribution,
      distributionPaths: ['/*'],
      destinationBucket: websiteBucket
    });